
⚠️ This guide can take up to 30min to complete - it's highly recommend to allow the CreatorCommerce team to do this for you. Submit this form to enable the CreatorCommerce team to complete email setup for you.
However, if you'd like to learn and do this yourself, you can complete the remainder of this guide to accomplish a lightweight implementation.
Step 1: Create a segment for CreatorCommerce Invitees
When the flow that follows is built & enabled, it will use the following segment to target individuals who should be given CreatorCommerce access. For this reason, when creating the segment, you'll initially want to leave the definition blank, as to avoid adding anyone to it before it has been tested end-to-end with the entire flow. This will already be done if you setup your primary Klaviyo invitation flow. To create the segment that will power the invitation flow, follow these steps in Klaviyo:
- Go to Lists & Segments
- Click Create "List/Segment"
- Select "Segment"
- Title your Segment "CreatorCommerce Invitees"
- Apply the tag "CreatorCommerce"
- For the definition, select "Properties about someone", and then select "Email". Enter the email address of "[email protected]".
- Click "Create Segment"
Expected result: A segment will be created with no profiles included. This is good news because it allows us to build a flow around this segment, that we can add people to later to test with.
Step 2: Create an email template for your emails
Make your life easier by creating an email template (which should essentially be a simpler version of your existing templates). This will already be done if you setup your primary Klaviyo invitation flow.
Create the template
- Go to Templates
- Click "Create a Blank Template" or click to "Clone Template"
- Name your template "CreatorCommerce Template"
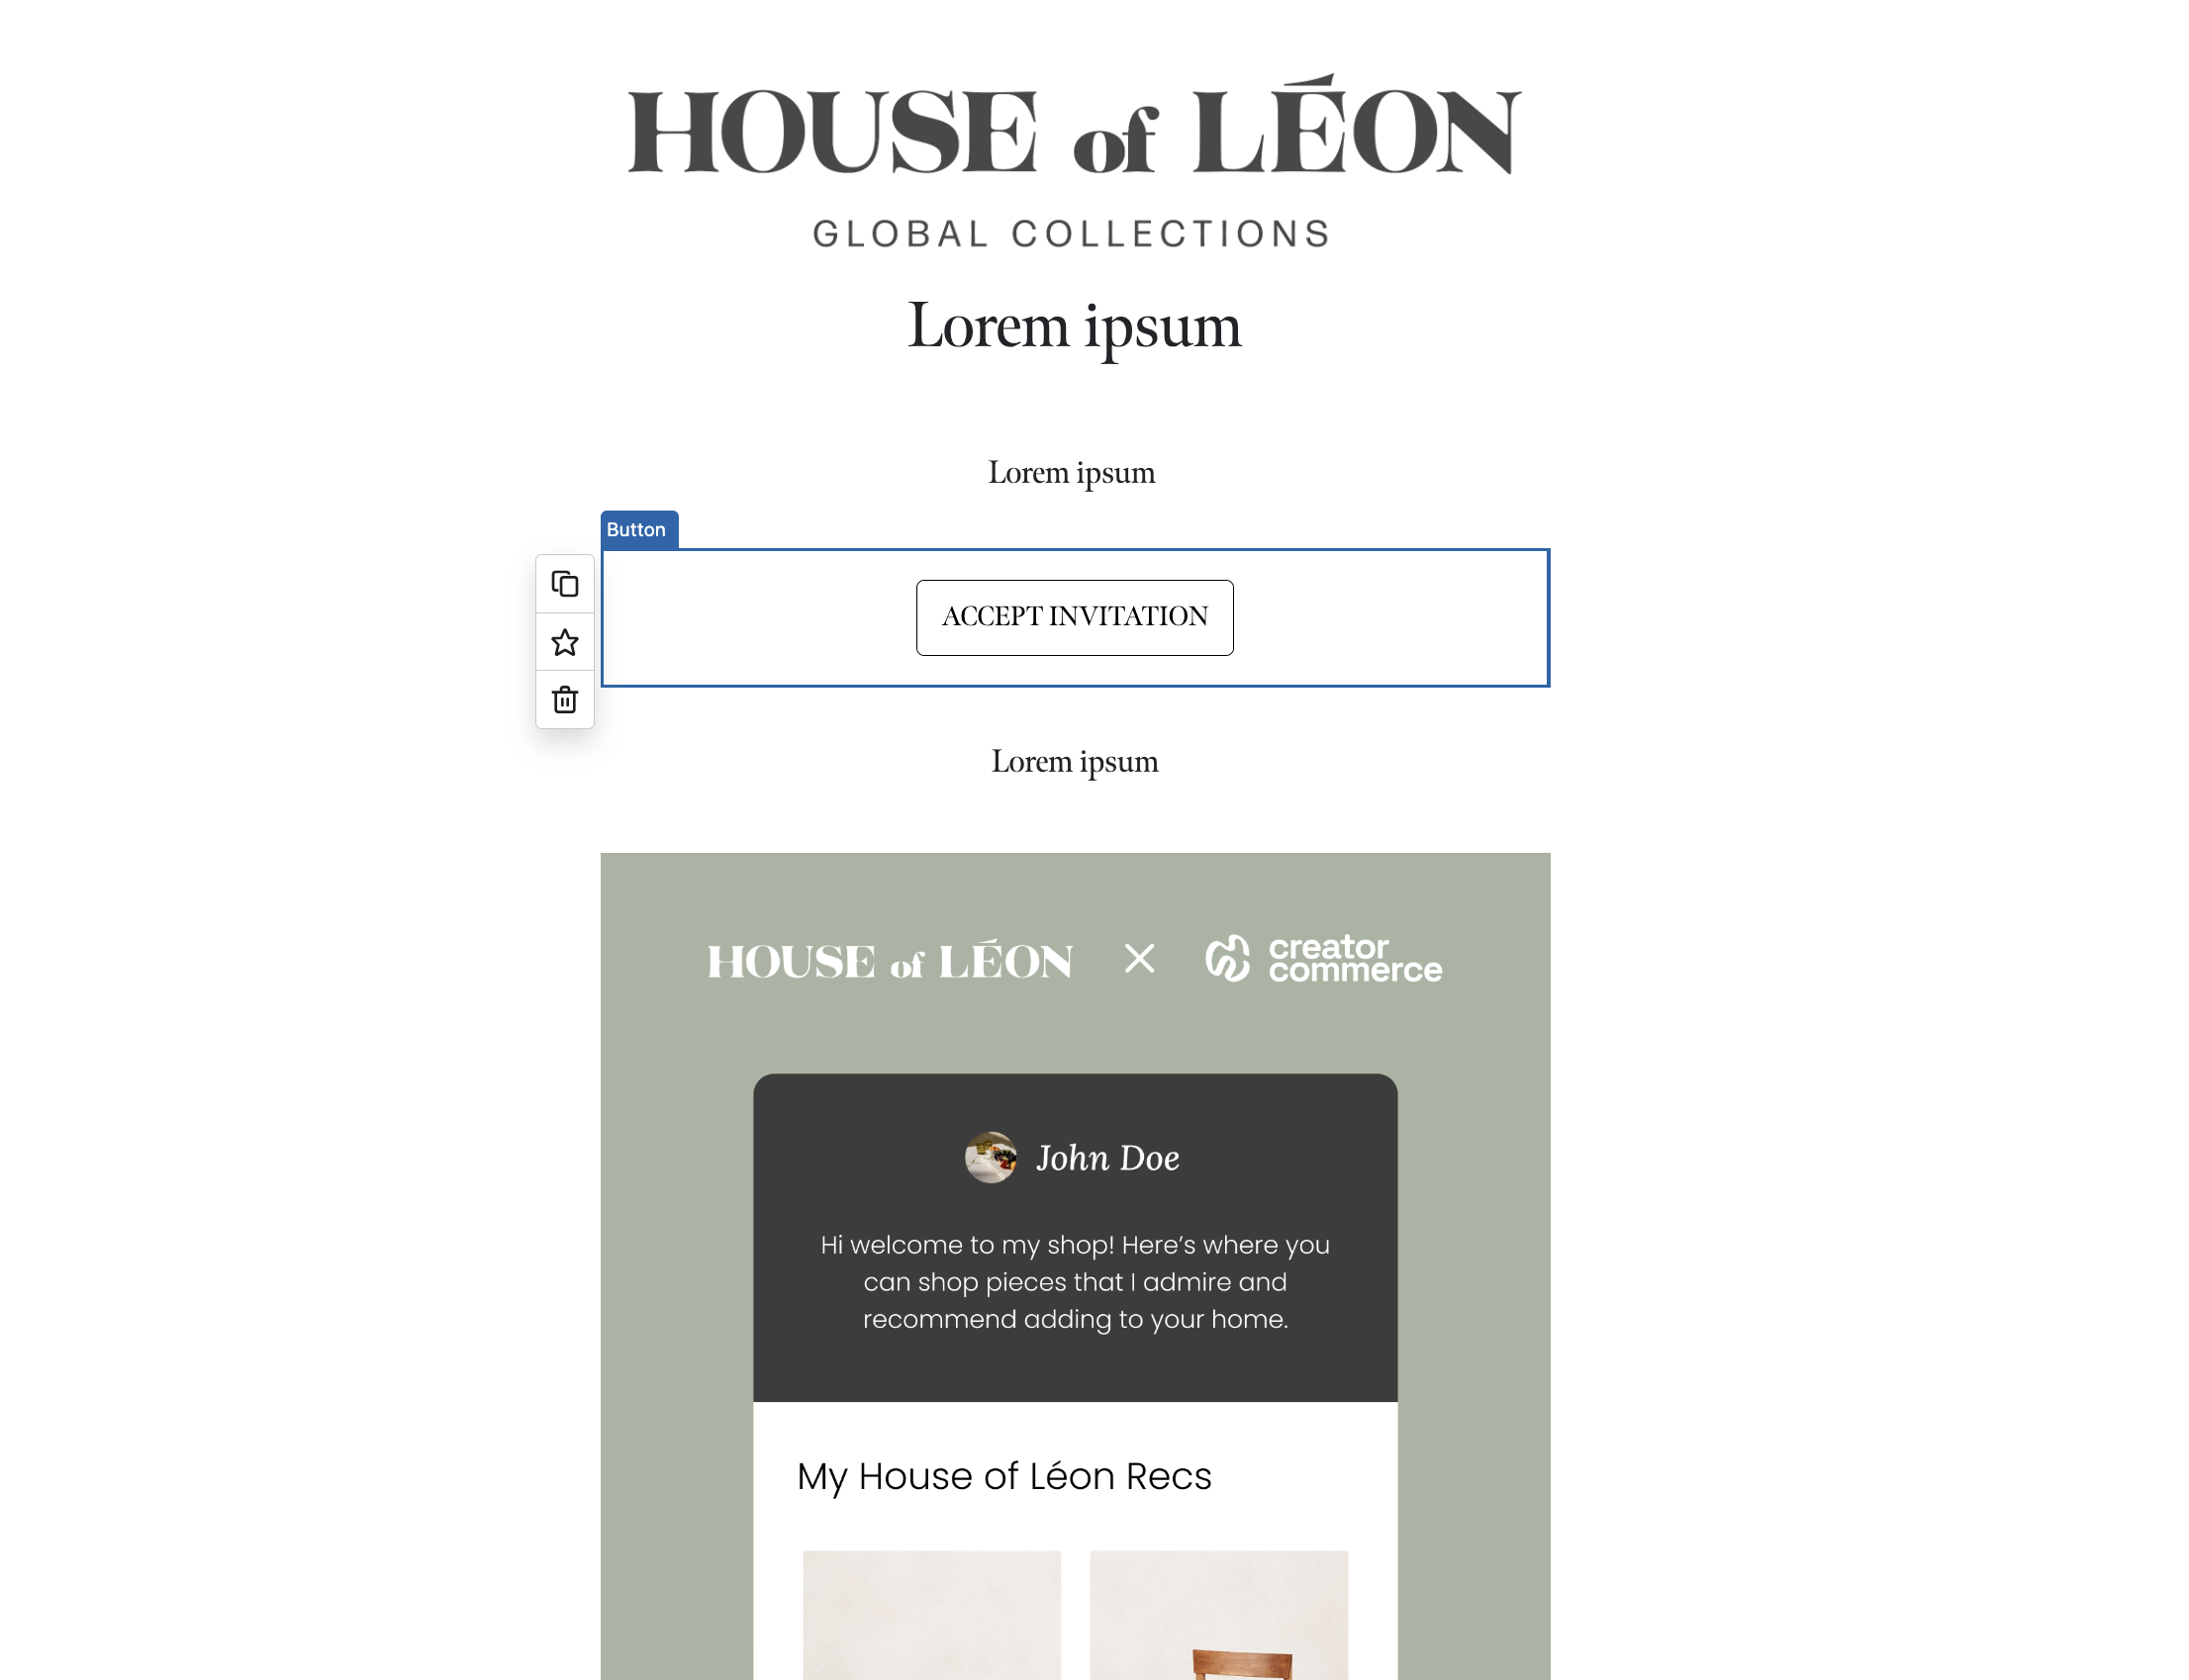
Template sections
- Brand Logo/Header - Set to your brand logo
- H1 Title - Set to "Lorem ipsum"
- Body Copy Section 1 - Set to "Lorem Ipsum"
- CTA/Button - Set copy to "Accept Invitation", and set link "https://dashboard.creatorcommerce.shop/invitation?email={{ email }}&channel=<<INSERT-MYSHOPIFY-DOMAIN-HERE>>"
- Body Copy Section 2 - Set to "Lorem ipsum"
- (Optional) Promotional/teaser image that shows off what a shop looks like - Contact us to get one for your brand
Pro tip: Don't forget to replace <<INSERT-MYSHOPIFY-DOMAIN-HERE>> with your actual myshopify domain such as: https://dashboard.creatorcommerce.shop/invitation?email={{ email }}&channel=house-ofleon.myshopify.com
Step 3: Repeatable steps for each Klaviyo Flow
As you build out the flows, there's a handful of steps that will take place for each any every flow. Repeat these steps each & every time.
Base each flow to the "CreatorCommerce Invitees" Segment
When creating each flow, you'll select the "CreatorCommerce Invitees" segment as the trigger condition.
Add a delay step at the beginning
Before adding any steps to the flow, add a 30 minute delay to each flow.
Update profiles that get invited to CreatorCommerce
To support with any future tracking or reconciliation, it's recommended to update profile properties when a user has officially heard about the opportunity with CreatorCommerce.
- For the second step in the flow, after the delay (or as the first step if the flow does not have a delay), add the "Profile property update" block
- For the configuration, select "Create new property" with a "Property Label" of "invited-to-creatorcommerce", a type of "Boolean", and a "Property Value" of "True". When complete select "Save".
Step 4: Create the flows
It's time to assemble the flows.
Setup the foundation for each flow
- Go to Flows
- Click "Create flow"
- Click "Create From Scratch"
- Name your flow accordingly and apply the tag "CreatorCommerce"
- Set the starter trigger to be based on inclusion in "CreatorCommerce Invitees"
- Add the relevant delays & profile property updates
The examples below provide a generic approach for updating your SARAL flows for CreatorCommerce. It's recommended to emphasize positioning & tone that better reflect the merits of your current affiliate programs.
Email - SARAL - Manually Added Influencers
Building email #1
- Start by adding the "Email" block onto the flow
- Select the dots on the email block to start building the email and select "CreatorCommerce Template" when choosing a template
- Implement messaging from one of the copy outline below
- After editing & saving the email, select to disable/uncheck "Skip recently emailed profiles", and also make sure "Enable UTM Tracking" is enabled/checked
Email #1
Subject: Make money promoting our products! 💸
H1 Title: Welcome aboard
Body Copy Section 1:
Hey {{ first_name|default:'' }},
Thanks for joining our affiliate program! We’re glad to have you on board.
As an affiliate, you now have the power to unlock incredible earning potential by sharing your {{organization.name}} affiliate shop with your audience. Every time someone clicks through and makes a purchase, you'll get paid a {{person|lookup:"SARAL - Commission Percentage"|default:'' }} commission 💰
To finish sign up, setup your shop below, where your discount code will always be applied when someone shops on it.
CTA/Button: Launch my affiliate shop (Link: "https://dashboard.creatorcommerce.shop/invitation?email={{ email }}&channel=<<INSERT-MYSHOPIFY-DOMAIN-HERE>>")
Body Copy Section 2: We're working with CreatorCommerce to provide you with an affiliate shop that's built for referrals. You'll be able to personalize your shop with your favorite products & your content.
Building email #2
- Start by adding a "Conditional split" block to the flow
- Select the block, and select "What someone has done (or not done)" as the condition, and select "Clicked Email", "at least once", "since starting this flow"
- For "Yes" path, do nothing
- For "No" path, add a "Time delay" block to the flow
- Select the block, and set it to 1 day
- Drag-and-drop the "Email" block onto the flow for the next step in the flow
- At this point make sure the "Yes" branch for the decision tree ends the flow, and that the "No" branch leads to the "Time delay" and "Email" block for email #2
- Select the dots on the email block to start building the email and select "CreatorCommerce Template" when choosing a template
- Implement messaging using the email copy outline below
- After editing & saving the email, select to disable/uncheck "Skip recently emailed profiles", and also make sure "Enable UTM Tracking" is enabled/checked
Email #2
Subject: Following up on your new opportunity
H1 Title: Following up on your new opportunity
Body Copy Section 1:
Hey {{ first_name|default:'' }},
You were recently invited to our affiliate program, so we wanted to send over a quick email recapping how the program works.
As an affiliate, you have the opportunity to earn rewards & cash by referring your friends to shop with us.
Here’s an overview of how you can earn:
- Share your affiliate shop with friends & family and let them know they'll get {{ person|lookup:"Referral Friend Offer - SocialSnowball"|default:"" }} off by buying from you
- Then get {{ person|lookup:"SARAL - Commission Percentage"|default:"" }} paid back on every purchase 💰
To complete sign up, click below to setup your co-branded affiliate shop with {{organization.name}}!
CTA/Button: Launch an affiliate shop (Link: "https://dashboard.creatorcommerce.shop/invitation?email={{ email }}&channel=<<INSERT-MYSHOPIFY-DOMAIN-HERE>>")
Body Copy Section 2: We're working with CreatorCommerce to provide you with an affiliate shop that's built for referrals. You'll be able to personalize your shop with your favorite products & your content.
Building email #3
- Start by adding a "Conditional split" block to the flow
- Select the block, and select "What someone has done (or not done)" as the condition, and select "Clicked Email", "at least once", "since starting this flow"
- For "Yes" path, do nothing
- For "No" path, add a "Time delay" block to the flow
- Select the block, and set it to 2 days
- Drag-and-drop the "Email" block onto the flow for the next step in the flow
- At this point make sure the "Yes" branch for the decision tree ends the flow, and that the "No" branch leads to the "Time delay" and "Email" block for email #2
- Select the dots on the email block to start building the email and select "CreatorCommerce Template" when choosing a template
- Implement messaging using the email copy outline below
- After editing & saving the email, select to disable/uncheck "Skip recently emailed profiles", and also make sure "Enable UTM Tracking" is enabled/checked
Email #3
Subject: She earned $900 by referring friends to {{organization.name}}
H1 Title: She earned $900 by referring friends to {{organization.name}}
Body Copy Section 1:
Hey {{ first_name|default:'' }},
One simple social media post with a link-in-bio to purchase has generated our top affiliates this month:
- $218 in cash commissions
- $429 in cash commissions
- and $1,210 in cash commissions
And those are just a few of them!
Imagine getting all of that just by sharing your experience with {{organization.name}}?
Here's exactly how they did it:
Step 1️⃣: Record a video with a product
Step 2️⃣: Share it with friends, family, and social media
Step 3️⃣: Give them your affiliate shop link and let them know they'll get a discount by purchasing from it
Pro tip: Replace your link-in-bio link with your affiliate shop link whenever you post to maximize earnings.
Setup your co-branded affiliate shop with {{organization.name}} and CreatorCommerce below!
CTA/Button: Setup your co-branded affiliate shop (Link: "https://dashboard.creatorcommerce.shop/invitation?email={{ email }}&channel=<<INSERT-MYSHOPIFY-DOMAIN-HERE>>")
Body Copy Section 2: We're working with CreatorCommerce to provide you with an affiliate shop that's built for referrals. You'll be able to personalize your shop with your favorite products & your content.
Building email #4
- Start by adding a "Conditional split" block to the flow
- Select the block, and select "What someone has done (or not done)" as the condition, and select "Clicked Email", "at least once", "since starting this flow"
- For "Yes" path, do nothing
- For "No" path, add a "Time delay" block to the flow
- Select the block, and set it to 3 days
- Drag-and-drop the "Email" block onto the flow for the next step in the flow
- At this point make sure the "Yes" branch for the decision tree ends the flow, and that the "No" branch leads to the "Time delay" and "Email" block for email #2
- Select the dots on the email block to start building the email and select "CreatorCommerce Template" when choosing a template
- Implement messaging using the email copy outline below
- After editing & saving the email, select to disable/uncheck "Skip recently emailed profiles", and also make sure "Enable UTM Tracking" is enabled/checked
Email #4
Subject: There is real money on the table here
H1 Title: There is real money on the table here
Body Copy Section 1:
Hey {{ first_name|default:'' }},
I wanted to reach out to remind you that you could be earning some serious money from your new position with us as an affiliate partner.
One massive upside to our program is that the earning potential is unlimited. As long as you keep getting sales, you keep getting paid.
Here’s an overview of how you can earn:
- Share your affiliate shop with friends & family and let them know they'll get {{ person|lookup:"Referral Friend Offer - SocialSnowball"|default:"" }} off by buying from you
- Then get {{ person|lookup:"SARAL - Commission Percentage"|default:"" }} paid back on every purchase 💰
To unlock these earnings, setup your co-branded affiliate shop with {{organization.name}} below:
CTA/Button: Setup your co-branded affiliate shop (Link: "https://dashboard.creatorcommerce.shop/invitation?email={{ email }}&channel=<<INSERT-MYSHOPIFY-DOMAIN-HERE>>")
Body Copy Section 2: We're working with CreatorCommerce to provide you with an affiliate shop that's built for referrals. You'll be able to personalize your shop with your favorite products & your content.
Building email #5
- Start by adding a "Time delay" block to the flow (No decision tree for this one)
- Select the block, and set it to 4 days
- Drag-and-drop the "Email" block onto the flow for the next step in the flow
- Select the dots on the email block to start building the email and select "CreatorCommerce Template" when choosing a template
- Implement messaging using the email copy outline below
- After editing & saving the email, select to disable/uncheck "Skip recently emailed profiles", and also make sure "Enable UTM Tracking" is enabled/checked
Email #5
Subject Join our community ❤️
H1 Title: Join our affiliate community
Body Copy Section 1:
Hey {{ first_name|default:'' }},
It's <<INDIVIDUAL-NAME>> here, I’m the <<POSITION>> of {{organization.name}}. I wanted to send you an email to remind you that you've been invited into our community of affiliates.
By joining our program, you'll earn cash by sharing a co-branded shop link with friends and family. When someone buys using your shop link, they'll receive {{ person|lookup:'Referral Friend Offer - SocialSnowball'|default:'' }} off their order and we'll send you {{ person|lookup:'Referral Reward - SocialSnowball'|default:'' }} to a payout method of your choice.
All the best,
<<INDIVIDUAL-NAME>>
Founder of {{ organization.name }}
CTA/Button: Create a co-branded shop with {{organization.name}} (Link: "https://dashboard.creatorcommerce.shop/invitation?email={{ email }}&channel=<<INSERT-MYSHOPIFY-DOMAIN-HERE>>")
Step 5: Saving & completing
Make sure all flows are enabled
- Go to "Flows"
- Search for "SARAL" in the search bar
- Open each SARAL flow in a new tab
- Ensure that all new email/SMS steps are set to "Live"
Edit the definition for "CreatorCommerce Invitees"
- Go to the "CreatorCommerce Invitees" segment
- Click to "Edit Definition"
- Set definition to "Properties about someone" then "SARAL - Coupon Code 1" then "is set"
- Then click "Update Segment"

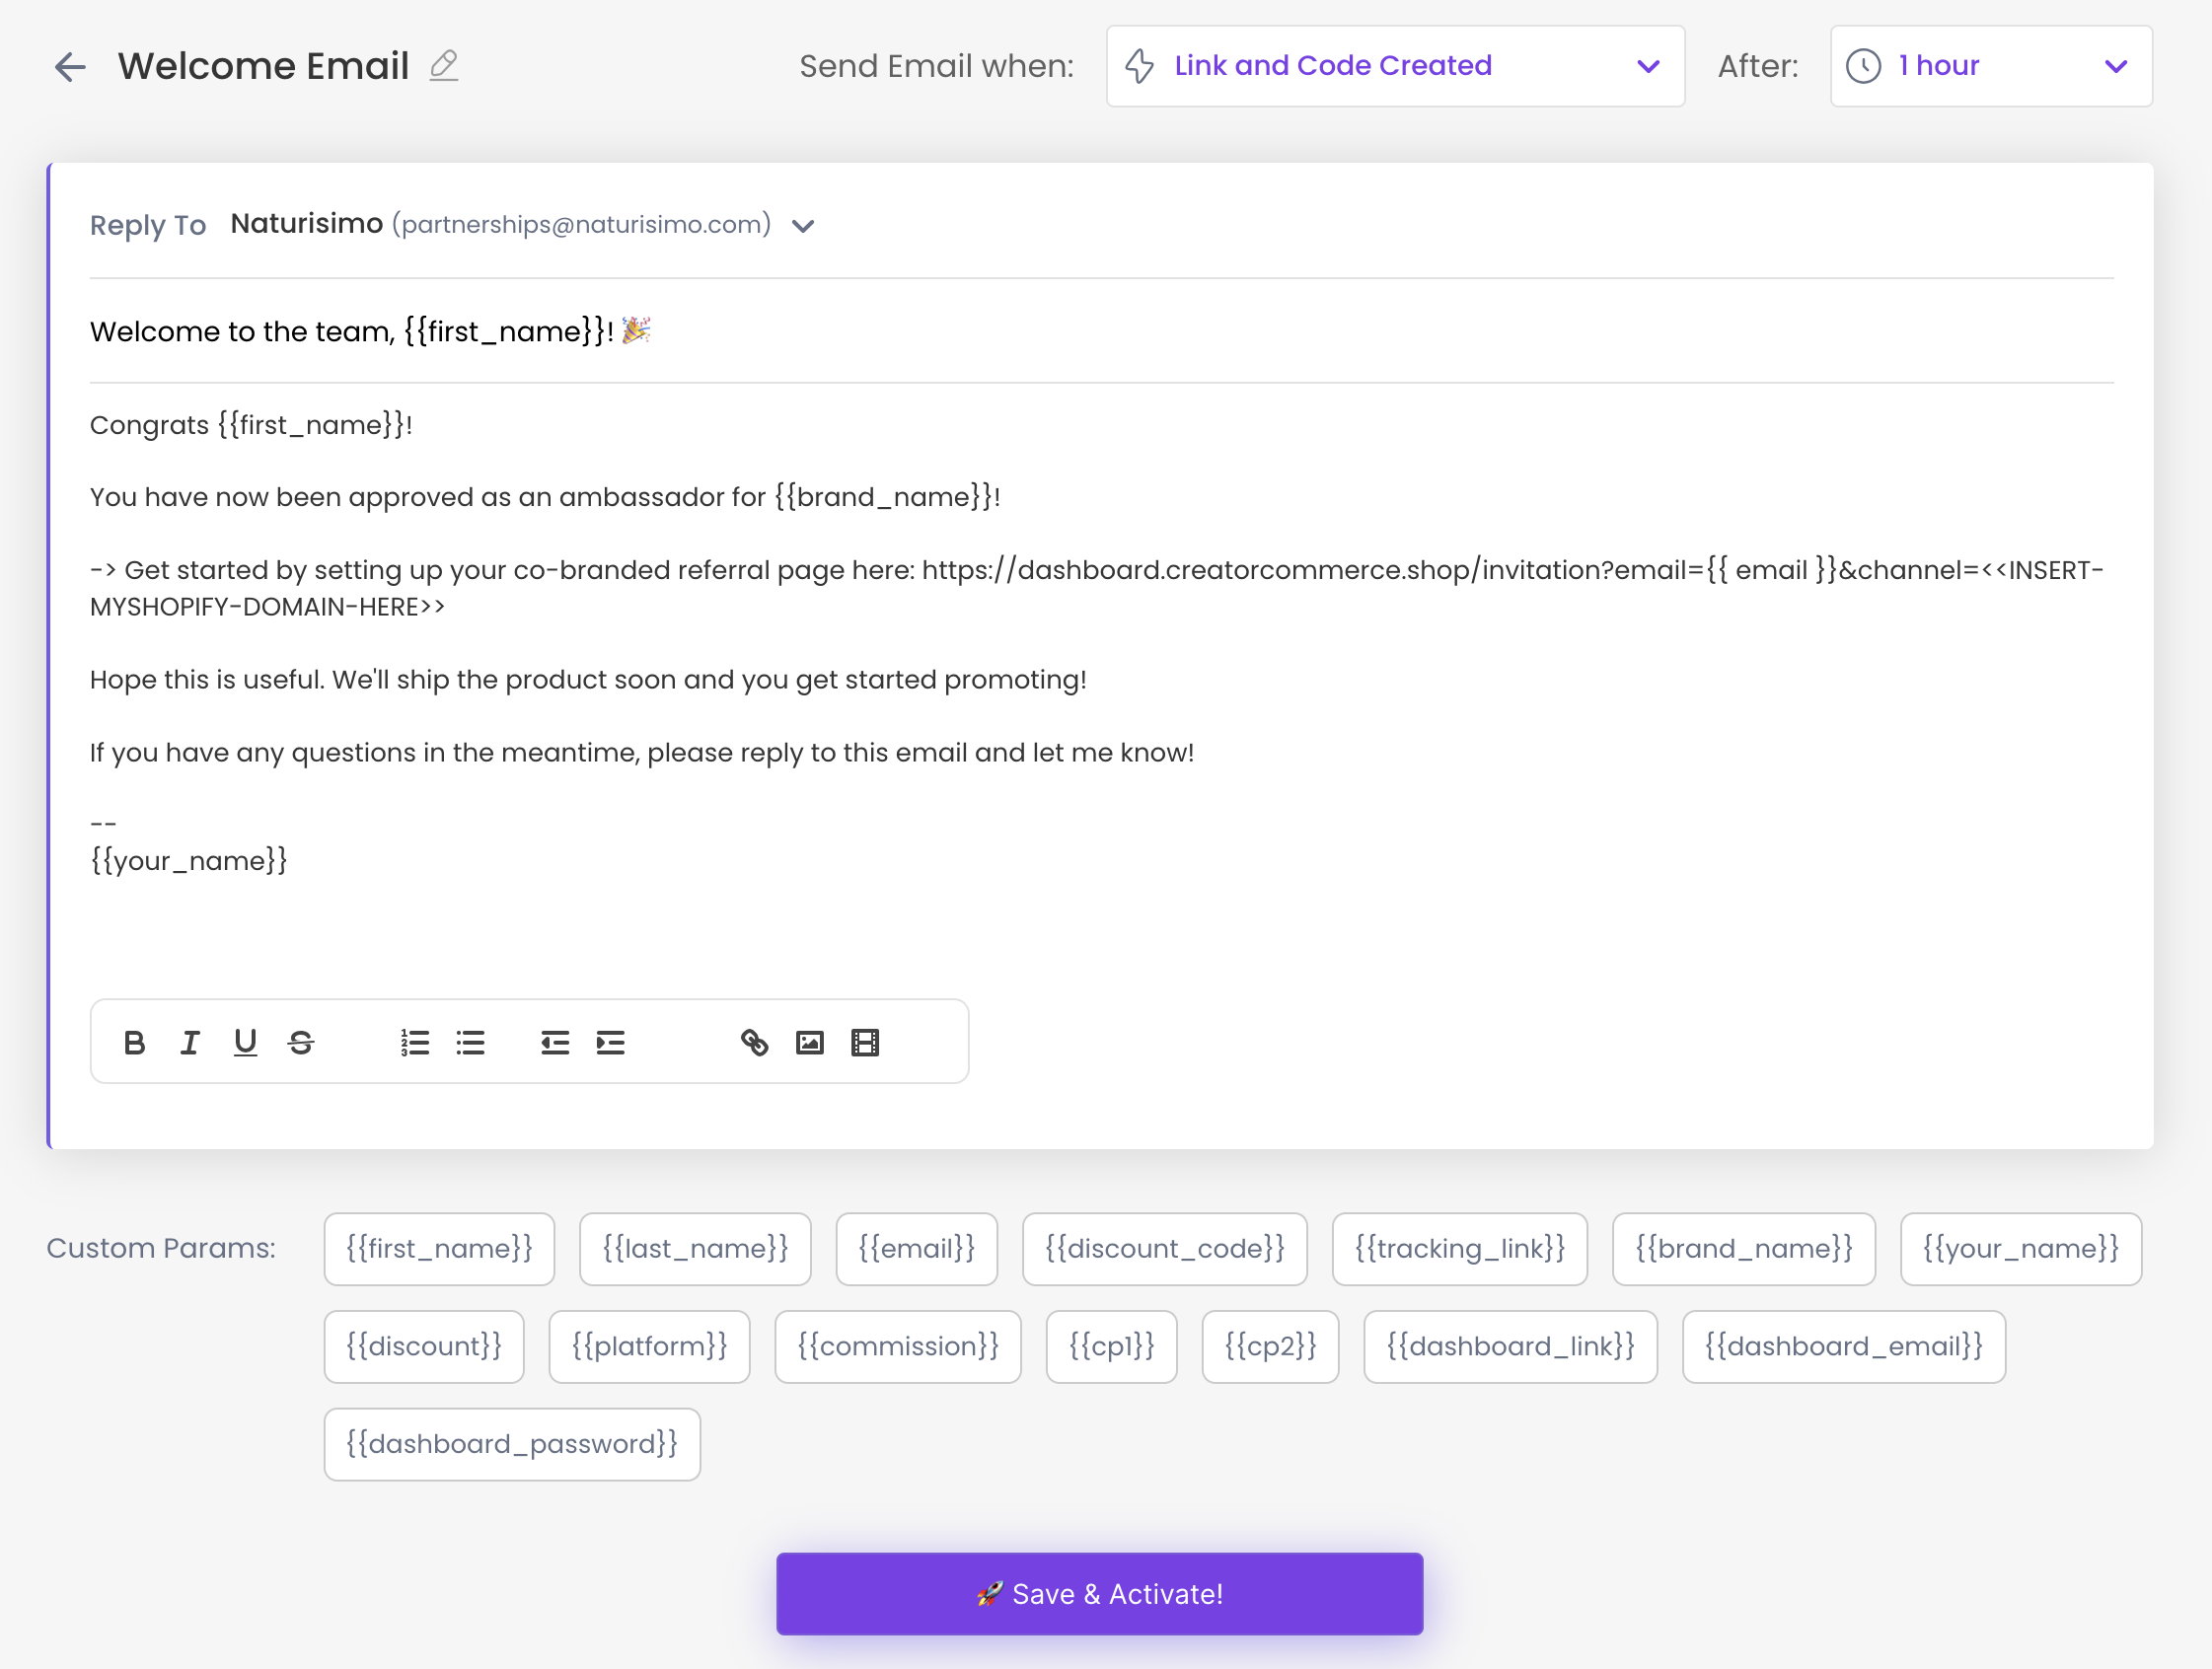
Edit the SARAL welcome email
- Go to the SARAL Dashboard
- Click "Email Drips"
- Select the "Activation" tab
- Click the "Welcome Email"
- Change this line "- Here's your coupon code with {{discount}} off: {{discount_code}} - Here's your unique tracking link to use: {{tracking_link}}" into this one "-> Get started by setting up your co-branded referral page here: https://dashboard.creatorcommerce.shop/invitation?email={{ email }}&channel=<<INSERT-MYSHOPIFY-DOMAIN-HERE>>"
- Click "Save & Activate!"
Now, you're all set to invite SARAL influencers to co-sell on CreatorCommerce.
Still stuck and trying to get live? No worries, let's get you situated. Book a support call with us here.


%201.png)
%201.png)