
This article covers the three things you need to do to connect Roster to CreatorCommerce: have the Roster team enable the integration and give you an API key, route Roster Smart Link traffic through the CC redirect so clicks carry creator attribution, and turn on Destinations for the Roster programs you want to sync.
What you'll need
- An active Roster account with ambassador programs already configured
- CreatorCommerce installed on your Shopify store
- Admin access in Roster so you can edit Smart Link destinations
- A support channel with Roster (Slack, email, or account manager)
Step 1: Ask Roster to enable the CreatorCommerce integration
The CreatorCommerce integration in Roster isn't self-serve. Your Roster account manager (or the Roster support team) needs to flip it on for your account and issue you an API key.
- Reach out to your Roster team and ask them to enable the CreatorCommerce integration on your account.
- Ask them to send you an API key with access to read programs and ambassadors.
- Once you have the key, open the CreatorCommerce dashboard and go to Integrations → Roster. Paste the API key (and the optional
apiDomainif Roster gave you a custom one) and save.
Treat the API key like a password. Store it in a password manager or secret store — anyone with this key can read your Roster programs and ambassadors.
Step 2: Install the Roster Sync Shopify Flow
CreatorCommerce pulls ambassadors from Roster on demand — something needs to tell CC when to run a sync. The CC // Roster Sync Shopify Flow does that for you on a schedule, so new Roster ambassadors automatically appear in CreatorCommerce without any manual work.
- Download the CC // Roster Sync flow.
- In your Shopify admin, open the Flow app and click Import. Upload the
.flowfile. - Open the workflow's trigger (the schedule node) and set the cadence you want — hourly, daily, or whatever matches how often new ambassadors join your Roster programs. Daily is a reasonable default.
- Review the HTTP action — it calls the CC sync endpoint
POST /webhooks/integrations/roster/webhooks/affiliates/sync. You don't need to edit it. - Toggle the workflow on.
Pick a cadence that matches your ambassador sign-up volume. If you onboard ambassadors in batches during campaign launches, daily is plenty. If Roster is a constant drip, hourly keeps CC fresher.
Step 3: Route Roster Smart Link clicks through the CC redirect
Roster Smart Links land every click on a single destination URL that you configure on the program. To get CreatorCommerce attribution and co-branded funnels, point that destination at the CC redirect endpoint instead of your homepage.
The CC redirect lives at:
https://<your-shopify-domain>/apps/cc-storefront/redirectWhen an ambassador's Smart Link is clicked, CC reads the ambassador context, resolves the right collab tier, and routes the shopper to the destination configured on that tier — everything downstream (storefront, discount, attribution, co-branded email variables) keys off that redirect.
- In Roster, go to Programs and open the program you want to route through CreatorCommerce.
- Click the Referrals tab and open the program's Smart Link.
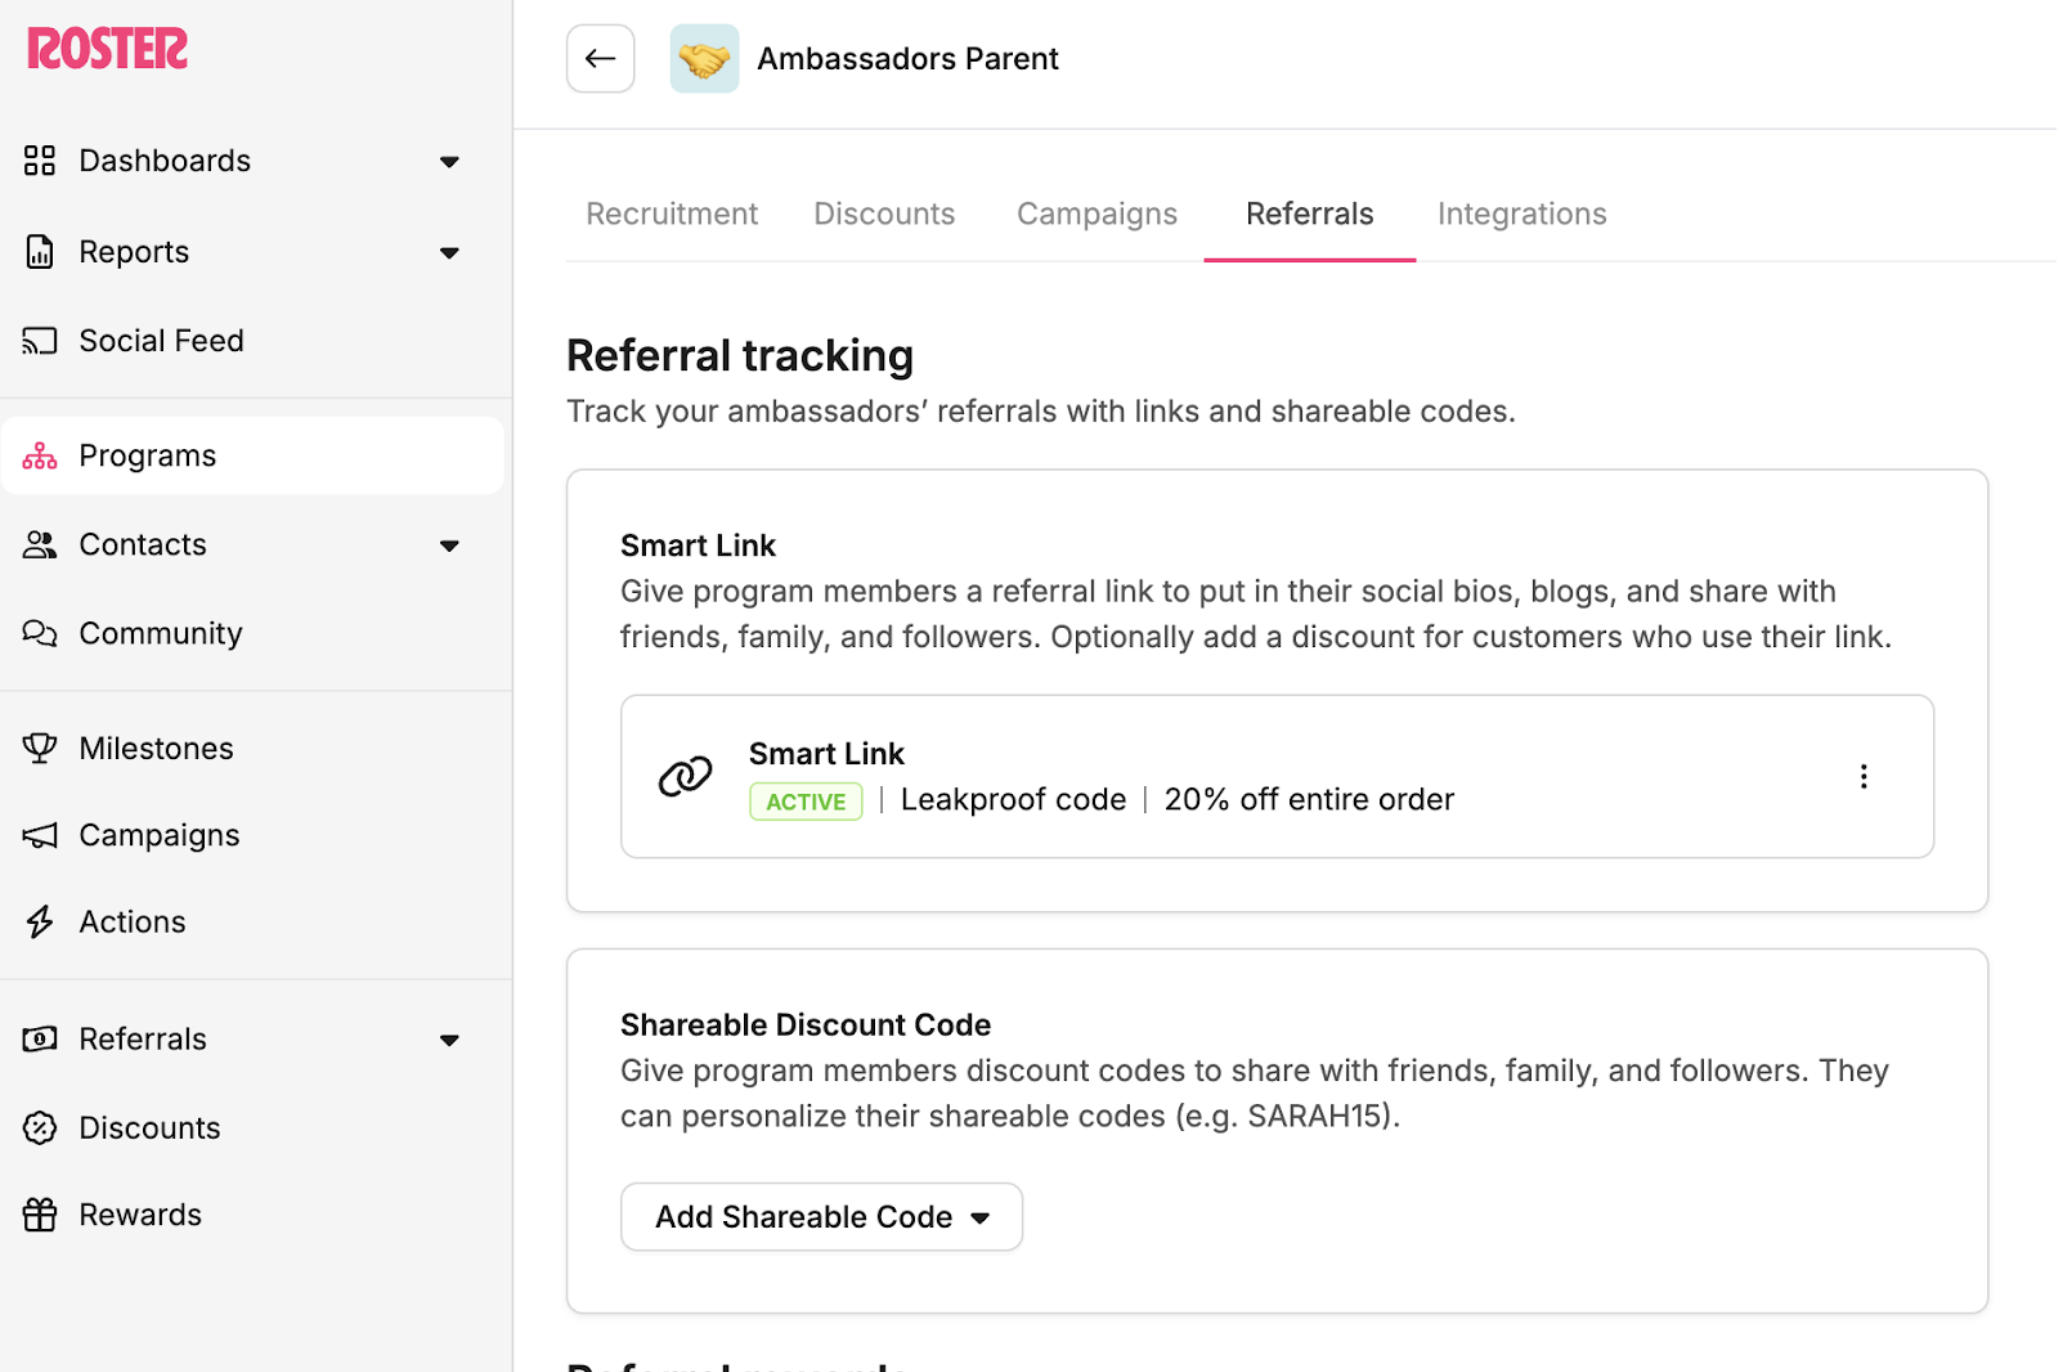
- In the Edit Smart Link modal, set the Destination URL to
<your-store>.com/apps/cc-storefront/redirect(or the matchingmyshopify.comdomain if you prefer — both resolve to the same app). - Save the Smart Link.

Repeat this for every Roster program you want to run through CreatorCommerce. Programs you don't update will keep landing on whatever URL they're currently pointed at.
Roster's Shareable Discount Codes don't need a destination URL change — those work by discount code, and CC picks up the attribution from Shopify's cart once the code is applied. Only the Smart Link needs updating.
Step 4: Turn on Destinations for each synced Roster program
Once Roster is pushing ambassadors into CreatorCommerce, each program shows up as a collab tier in CC. Destinations are how you tell CC what landing experience each tier should get when a shopper hits the redirect.
- In the CreatorCommerce dashboard, go to the campaign that corresponds to the Roster program you enabled.
- Open the tier (for example Ambassadors).
- Set the Destination — most brands start with the Creator Landing Page (the metaobject-powered co-branded storefront) so every ambassador gets their own page.
- Optionally append a
?view=query parameter to swap in a campaign-specific template. - Save. Repeat for each tier in each Roster program you've synced.
Common destination patterns:
- Ambassadors → Creator Landing Page (
/pages/creators/{{shop.handle}}) for dedicated co-branded storefronts - Affiliates → Collection or homepage for lightweight co-branding
- VIP / Celebrity → Custom landing page for a full brand takeover
Troubleshooting
Smart Link clicks aren't attributing in CC
- Confirm the Smart Link's Destination URL points at
/apps/cc-storefront/redirectwith no path typos (the leading/appsand slash matter). - Check that the Roster program is actually syncing ambassadors into CC — if the ambassador isn't in CC yet, the redirect has nothing to resolve against.
Some ambassadors aren't appearing in CreatorCommerce
- Roster syncs on a schedule (or when your Shopify Flow calls the CC sync endpoint). Newly added ambassadors may take a sync cycle to propagate.
- Confirm the ambassador's Roster program is one of the programs you enabled Destinations for on the CC side.
The shopper lands on the wrong page
- Open the tier the ambassador belongs to in CC and confirm the Destination is set. If it's blank, CC falls back to the homepage.
- If you're using a
?view=template, make sure that template actually exists in your Shopify theme.
You're connected
With Roster enabled, Smart Links routed through the CC redirect, and Destinations set on each synced program's tiers, every Roster ambassador click funnels through CreatorCommerce and lands on the co-branded experience you configured.


%201.png)
%201.png)